Fixing fonts that display in the default font in Inkscape
The Problem
Sometimes Inkscape will display a font in its own default font – for me this is a sans-serif of some kind – instead of the font you want.
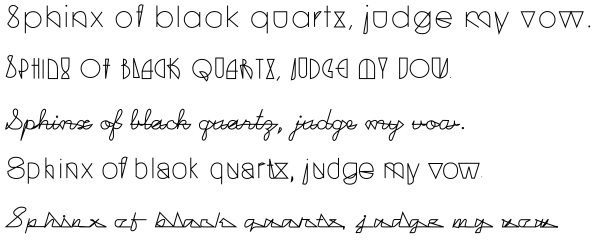
I encountered this recently with three of the otherwise very useful Machine Tools fonts, which are intended to be used as single line fonts. I use them in the sketch tool for my Silhouette Curio.
How I Fixed It
The cause of this seems to be that the font file contains some formatting errors and Inkscape can’t read it properly (and thus, I suppose, gives up).
I opened up Font Forge, an open source font editor (available for Windows/Mac/Linux) to take a look. I know nothing about fonts, but I was hoping it would have a “repair font” function or something. No such luck, unfortunately.
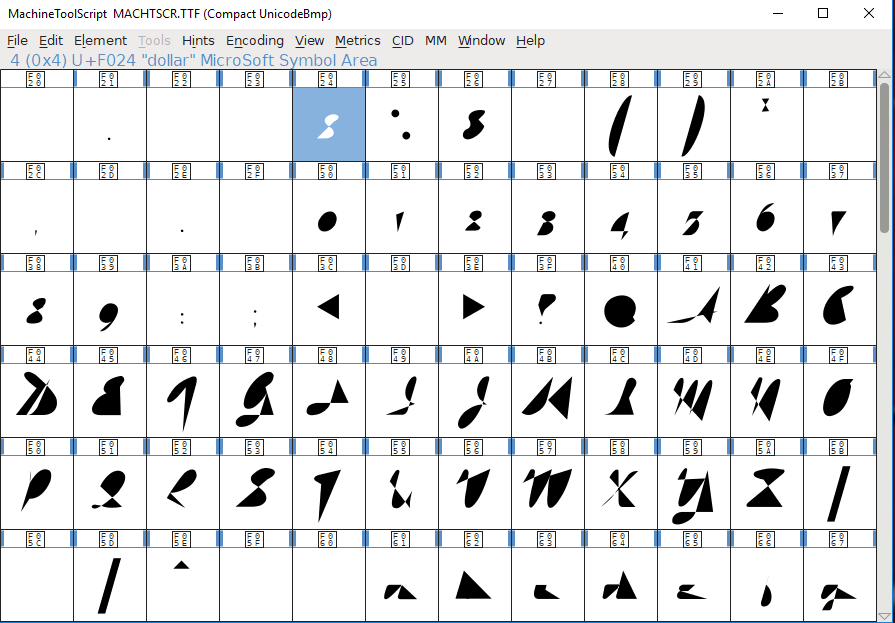
I did notice that where there should have been the standard English alphanumeric characters, there was nothing. When I enabled Encoding->Compact from the top menu to remove all characters that have no glyphs, I could see that the characters were in there, but they were showing up in the wrong part of the glyph table.
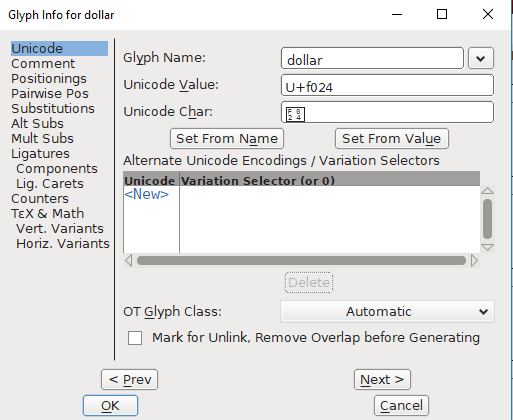 At this point I right clicked on the glyph and chose “Glyph Info” (also available from the Element menu and by typing
 ctrl-i). I could now see that the glyph name was correct, but the unicode value and char were not. So I clicked “Set From Name”, and then when I went back to the main screen it had been updated, highlighted in blue so I knew its value had been changed.
But I didn’t want to do this individually for every single character, and the “Glyph Info” option was disabled when multiple glyphs were selected.
Enter the Font Forge scripting function. After a bit of digging through the documentation for any kind of example that just modified the current character set, I found a short sample that was intended to be used in an active Font Forge window and alter all selected glyphs. Perfect. I dropped in the function I’d found in the Scripting Functions documentation to update the glyph name, and enabled the flag that would update the unicode value and the ligature string from that name.
In short, this script replaces the glyph name with its current value, but sets the unicode and ligatures to match in the process.
#Reset the glyph names of all selected characters, overriding unicode and ligatures
#designed to be run within an interactive fontforge session.
foreach
SetGlyphName(GlyphInfo("Name"), 1);
endloop
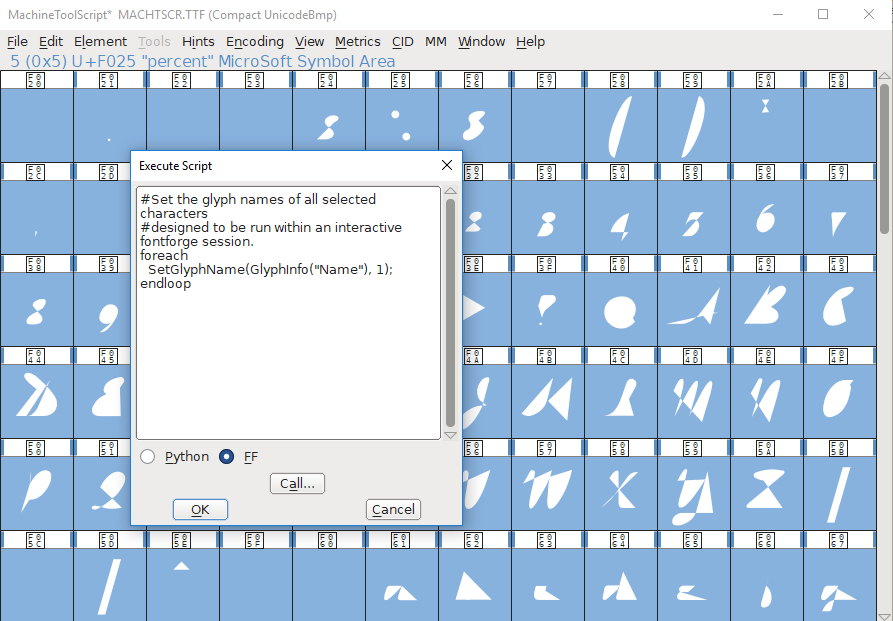 I selected all the characters and pasted the above script into File->Execute Script, choosing “FF” instead of “Python” from the radio buttons at the bottom. I then clicked OK.
It worked! All the characters now had their correct identity above them in the glyph table.
I then exported as TTF (File->Generate Fonts, then choosing “True Type” from the dropdown) – the validation complained, but I decided to forge ahead regardless. I saved the TTF file in a new location and then installed it in Windows again, choosing to override the previous version when prompted. I tried re-encoding (Encoding->Reencode->) first to eg. Unicode Full or Latin1, but it didn’t seem to make any difference in Inkscape.
I closed and reopened Inkscape to reset the font cache, opening the SVG file I’d been testing the font in.
Success! The font was now displaying correctly, or at least as correctly as it could in Inkscape, which doesn’t handle single line fonts very well.